Your shopping cart is empty!


Featured


Anodising Guide
Version 1.5 of January 23, 2026
Anodizing aluminum? Isn’t that very complicated and only possible through specialized—and therefore expensive—companies? No, with the right tools and dyes, anodizing is actually quite simple. This guide provides you with the necessary background knowledge and shows you how to enhance and harden your aluminum parts.
We have compiled this guide to the best of our knowledge. However, errors and inaccuracies can always occur, so we cannot guarantee the correctness of the instructions. Please keep in mind that the chemicals used are partially aggressive and toxic. Follow the provided safety instructions carefully for your own safety! You act at your own risk. We are not liable for any damage resulting from the use of the procedures described here.
Contents
- 1 What is anodizing?
- 2 Basics
- 3 Industrial practice
- 4 DIY anodizing
- 5 Work steps
- 6 Chemical disposal
- Conclusion
© Electronic Thingks - Christoph Drube
This document is copyrighted. It may be copied and shared for private purposes as long as it remains complete and unaltered. Any publication (e.g., uploading to the internet) and especially commercial use requires our written permission.
1. What is „anodizing“?
Anodizing refers to the formation of a strong oxide layer using an electrolytic bath on aluminum and many of its alloys. Special processes can also produce such a layer on titanium, whereas other metals (iron, copper, etc.) cannot be anodized.
 In the first step, the surface is transformed in an electrochemical process and becomes porous up to a certain thickness. After the actual anodizing process, these pores are closed by so-called sealing and the chemical intermediate is converted to its final form. If the part is immersed in a suitable color bath before sealing, dye molecules settle into the pores and can be sealed in. By using color pastes, scratch-resistant, multi-colored surfaces can also be created.
The resulting anodized layer is very hard and resistant to many chemical substances. Additionally, aluminum parts gain a refined, high-quality appearance. Unlike conventional paints, anodized layers cannot flake off, because they are formed from the aluminum surface itself and are therefore intimately bonded. During recycling, no problematic paint layers need to be disposed of, as the anodized layer is very thin and melts into slag in the furnace. Therefore, anodizing is also a very environmentally friendly form of surface finishing.
2. Basics
2.1 Properties of the layer
Bare aluminum oxidizes very quickly in air, forming a thin, air-impermeable, colorless oxide layer (Al2O3). This very thin layer (typically 0.5–1 µm thick) protects the metal from further attack by oxygen. It is relatively soft and unattractive and does not meet higher demands due to its minimal thickness. However, by deliberately building up this layer with an aqueous electrolyte, the following properties can be achieved:
- Hardness: about Mohs 9 (corundum); quartz has 7, diamond 10
- Layer thickness: 5–250 µm (0.005–0.25 mm), depending on voltage, bath duration, and other parameters
- Breakdown voltage: approx. 30 volts per µm
- Color: colorless to gray/blackish (depending on alloy); with suitable alloys, the metallic appearance of the underlying aluminum is preserved—even after coloring.
- With suitable dyes, can be colored scratch-resistant and lightfast; combining multiple dyes allows almost any desired shade
2.2 Chemical reaction
The main chemical reactions in the anodizing bath are:
Cathode (negative pole):
$$ 6\text{H}_3\text{O}^+ + 6e^- \longrightarrow 3\text{H}_2\uparrow + 6\text{H}_2\text{O} \quad \text{(reduction)} $$Anode (positive pole):
$$ 2\text{Al} \longrightarrow 2\text{Al}^{3+} + 6e^- \quad \text{(oxidation)} $$The aluminum ions react further:
$$ 2\text{Al}^{3+} + 9\text{H}_2\text{O} \longrightarrow \text{Al}_2\text{O}_3 + 6\text{H}_3\text{O}^+ $$Overall reaction:
$$ 2\text{Al} + 3\text{H}_2\text{O} \longrightarrow \text{Al}_2\text{O}_3 + 3\text{H}_2\uparrow $$Two things stand out:
- The formation of the layer itself does not require sulfuric acid. It acts as an electrolyte (which greatly reduces the bath’s electrical resistance) and, more importantly, locally dissolves the layer to allow current to flow and the layer to grow. Refreshing the sulfuric acid (restoring the original 15–20% concentration) is rarely needed due to the thin layers.
- Hydrogen gas forms at the cathode (negative pole), which must be safely vented in larger quantities due to explosion hazards (hydrogen is colorless, odorless, and tasteless!).
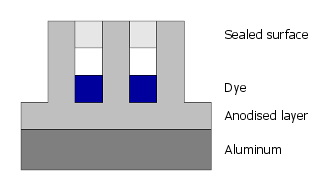
2.3 Structure of the anodized layer
First, a continuous layer forms electrolytically in the sulfuric acid bath, which develops fine, capillary-like pores as it grows:
Dye molecules can then settle into these pores:
Finally, the pores are closed by sealing.
The color is not applied superficially but is part of the anodized layer, making it highly resistant to abrasion and chemical influences.
3. Industrial practice
The following gives a rough overview of industrial anodizing processes to show what is possible. Which of these steps can be performed yourself will be explained below.
3.1 Surface treatment
First, the aluminum surface must be thoroughly cleaned and possibly prepared for the desired appearance. Depending on the desired finish, mechanical and chemical methods are used, such as:
- Sanding - evenly rough surface
- Brushing - rough surface with directional texture
- Polishing - very smooth surface
- Sandblasting - quite rough surface
- Pickling - slightly roughen
- Matting - slight roughening
- Satin finishing - slight roughening
Special brushing and coloring can now create a surface almost indistinguishable from stainless steel, with the advantage that fingerprints leave no marks on anodized layers. This makes them ideal for low-maintenance items.
3.2 Cleaning
A prerequisite for successful anodizing is an absolutely grease- and dust-free workpiece. Therefore, workpieces are thoroughly chemically cleaned before the anodizing bath, sometimes in caustic soda baths, but usually with specialized cleaners.
3.3 Rinsing
To remove all residues of cleaning agents, the workpieces are thoroughly rinsed with water.
3.4 Anodizing
Many electrolytes exist for different specialized applications. The most common and easiest method is the direct current sulfuric acid process (DC method). Workpieces are dipped as the anode (positive pole) in an aqueous sulfuric acid bath, while the cathode (negative pole) is made of lead, aluminum, or titanium plates. At about 12–18 V DC and 1.5 A/dm², anodizing occurs over 20–60 minutes.
Other processes include chromic acid and oxalic acid anodizing.
Hard anodizing achieves significantly higher layer thicknesses through very high bath voltages and low temperatures, used for extreme conditions in industry (bearing shells, hydraulic components, seawater applications).
3.5 Rinsing
To remove all acid residues and protect the dye bath, workpieces are rinsed thoroughly again, sometimes neutralized.
3.6 Dye bath
Coloring occurs in the dye bath at about 50°C. Depending on concentration, desired shade, and alloy, the workpiece remains up to 20 minutes.
3.7 Sealing
Immediately after the dye bath, the workpieces are placed in boiling water, sealing the anodized layer. The pigments are locked in, forming the desired scratch-resistant surface.
3.8 Notes
The entire industrial process is under constant monitoring, including acid or dye concentration, layer thickness measurement, and visual inspection. Some procedures are complex and beyond home application, but careful handling in small series allows for good results.
4. DIY anodizing
Now we move to the practical part, showing how to anodize and color aluminum with simple means. The results can rival industrial quality if done carefully.
Due to aggressive chemicals and resulting gases and vapors, perform all steps in a ventilated and safe area.
4.1 What can be anodized?
How well a workpiece can be anodized depends mainly on the alloy. Pure aluminum is ideal but rarely used due to its softness. The most common anodizing alloy is AlMgSi0.5. Aluminum-silicon alloys with high silicon content are often used for cast parts and produce good anodized layers, but have dark natural colors, making light coloring difficult. A list of common alloys and their anodizing/coloring suitability is available in our download section.
In principle, the purer the aluminum, the better it anodizes—though it becomes harder to machine. Some guidelines:
- AlSi cast alloys are rather matte and gray; AlMgSi0.5 shines silvery on cut surfaces
- How was the workpiece formed? Sand or die-cast parts are often highly silicon-alloyed; extrusion parts are usually very anodizable
- Almost all rod profiles are now extrusion or die-cast
- If in doubt, request a datasheet from the manufacturer
Surface condition also matters. Cast parts may be rough, porous, or cracked. Mechanical/chemical pretreatment can alleviate this.
Profiles may already be anodized—check first. An existing anodized layer must be removed before re-anodizing by pickling or mechanically.
Always perform a test run with a scrap piece for each new alloy!
Important:
During anodizing, the workpiece expands slightly due to layer formation. Depending on thickness, 0.005–0.03 mm increase is possible. Account for this in precision parts. Threads are less critical due to play.
4.2 What do I need?
The necessary chemicals and materials are generally inexpensive and widely available. If you encounter difficulties sourcing them, all chemicals required for anodizing can also be obtained from a pharmacy, though they may be somewhat more expensive there. Below is a list with approximate quantities for initial experiments:
- Sulfuric Acid (H2SO4, specific gravity approx. 1.15 g/cm³, corresponding to 15–20% concentration)
Quantity: depending on the size of the aluminum pieces – 1–5 liters is sufficient for initial attempts. The commonly available and inexpensive lead-acid battery acid is 37% sulfuric acid. By diluting it 1:1 with distilled water, the desired concentration can be easily achieved. - Sodium Hydroxide
Sodium hydroxide (NaOH, caustic soda) is available in drugstores, pharmacies, and sometimes hardware stores (as drain cleaner). Quantity: more than 500 g is fine, as it is very inexpensive. - Distilled Water (H2O dist.)
Quantity: 5 liters (canister)
Distilled water is available very cheaply in many grocery stores and hardware stores. Sometimes it is labeled as deionized water, which is practically the same and sufficient for our purposes. - Colors
Special anodizing dyes are of course best. These can be purchased inexpensively in small quantities from our online shop. Because these dyes are very intense, only small amounts are needed (depending on the shade, from about 10 grams). Such dyes have high lightfastness and are therefore ideal for coloring objects exposed to the outdoors (e.g., automotive parts, model making, etc.). Other options like textile dyes may work in individual cases but are much less lightfast, less efficient, and not cheaper. Results are by no means comparable to proper anodizing dyes. - Laboratory power supply or constant current source
- Plate or sheet of lead or aluminum (approx. 10 cm × 20 cm)
Lead sheets can be obtained from recycling centers or roofers (used for roof sealing), and aluminum sheets are generally widely available. Make sure the sheet is not anodized. - A thin aluminum or preferably titanium wire/rod
for suspending the workpiece in the anodizing bath and for electrical connection. - Appropriately sized plastic or glass containers for the anodizing and dye baths, and a heat-resistant container for sealing.
- Optionally, a pH meter and an hydrometer to determine acid concentration and H3O+ concentration. This allows for even better results in terms of coating thickness and color quality.
5. Work steps
Description of the steps to achieve successful anodizing. Follow this guide for professional-looking results.
5.1 Cleaning and surface preparation
Nitric acid and sodium hydroxide are extremely corrosive substances. Avoid all skin and eye contact! Wear
protection googles, acid-proofed gloves and robust clothing. Also, remember that strong
nitric acid has an oxidising effect. There is auto-ignition hazard particular in contact with organic materials
(e.g. cotton)!
In case of eye contact flush them immediately under running water and seek medical attention immediately. Else you take the risk of blindness!
Depending on the desired surface of the workpiece is pretreated mechanically (for example: grinding, brushing, polishing). Please note that the subsequent anodization does not forgive surface defects - in contrary, these are frequently more obvious after anodising. Take care of the preparations - you will avoid later trouble caused of a constantly visible scratch or even a complete repetition of the entire procedure.
All impurities (including fingerprints) on the surface deteriorate or prevent the formation of the anodisation layer at this area. That is why it is important to also clean the workpiece thoroughly chemically. Cleaning can be done, for example, with sodium hydroxide solution (which also leads to a slightly etched surface). However, it is better to use special cleaning agents which have been specially developed for this purpose.
After cleaning, you may not touch the workpiece anymore! Dip it now in the bath with tap water to remove the remains of the detergent by extensive flushing. Depending on the size and complexity of the workpiece, it is sufficient to keep it under plenty of running water first.
Notes:
A brief immersion of the part in nitric acid at this stage facilitates the formation of a
more beautiful anodised layer but, in our opinion, it is worth the extra effort only in exceptional cases. So
we will not go into details here.
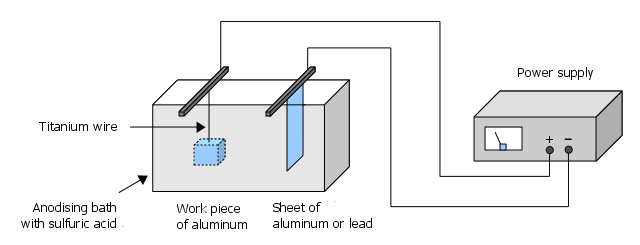
5.2 Anodizing
This is the most important step. The following graphic shows the basic setup of the anodizing bath:
The actual anodizing process takes place in 15–20% sulfuric acid. The exact concentration is not critical. If you have ordinary battery acid (~37% H2SO4), you can easily prepare the anodizing bath by mixing it 1:1 with distilled water. When doing this, and especially when diluting highly concentrated acid, the following applies:
Never pour distilled water directly into the sulfuric acid — always the other way around: slowly stir the sulfuric acid into the (preferably cold) distilled water. The mixture heats up strongly during dilution, otherwise there is a risk of splashing and vaporization!
Of course, also here: always wear safety goggles, gloves, and old clothing!
Once prepared, the solution can be safely stored for a long time, e.g., in canisters. Do not forget to clearly label the containers and never use drinking vessels (bottles, etc.).
The acid concentration can later be easily determined, for example with a so-called hydrometer (float scale). The immersion depth of the hydrometer indicates the density of the acid, which allows the concentration to be inferred.
All surfaces of the workpiece to be anodized must be immersed in the acid bath, because only surfaces exposed to the acid can form the anodized layer. This is most easily achieved using titanium wire, which can, for example, be inserted into a pre-existing hole in the workpiece. Since the current flows through this attachment simultaneously, the connection should be secure and the contact point non-slip. It is therefore not sufficient to simply string the workpieces like on a bead string. Often, it is enough to wrap the wire tightly around the workpiece several times or clamp it in a "V" shape. This ensures that the edges make contact so that no spots are missed on the large surfaces. Importantly, only aluminum of the same alloy or acid-resistant conductors (pure titanium is ideal) should be used for the holder — other metals are not suitable (keyword: electrochemical series of metals)!
Our workpiece forms the anode — we therefore connect the positive pole (usually marked red) of our power supply here. The cathode is our aluminum/lead plate, which we connect to the negative pole (usually black) of the power supply.
5.3 Current and duration calculation
The layer thickness is mainly determined by varying the anodizing duration and current, i.e., it depends on the total charge passed. As a rough guideline for the current to be applied, we recommend approximately
$$ \textbf{1.5 \text{A per 100 cm² of surface}} $$for an anodizing duration of about 60 minutes (= 3600 seconds) and a bath temperature of +20°C.
For better understanding, here is a small example:
Let our workpiece be an aluminum cube with an edge length of 10 cm. The total surface area of the cube (= six sides) is:
$$ 10\text{cm} \times 10\text{cm} \times 6 = 600 \text{cm²} $$From the above guideline, it follows that the power supply should deliver a current of
$$ 600 \text{cm²} \times \frac{1.5 \text{A}}{100 \text{cm²}} = 9 \text{A} $$for 60 minutes. Therefore, we leave our cube in the bath for 60 minutes at 9 amperes.
These values are, of course, only approximate, as the actual process, as described above, depends on the alloy used and other parameters such as agitation, temperature, etc. It is important to include all surfaces in contact with the acid in the calculation.
As the anodized layer grows, its electrical resistance increases and the current flow slightly decreases. This can be manually compensated by increasing the voltage, or you can use a current-regulated power supply and set the desired current beforehand. Tips for suitable power supplies can be found here: Which Power Supply?
A matte surface gradually forms and the shine disappears. At the cathode, hydrogen bubbles appear. This is normal and indicates that the electrochemical reaction is proceeding.
To estimate the duration for an unknown alloy, you should first use a sample as a test piece. Hang it, for example, at intervals of ten minutes, each two centimeters lower in the bath. This creates a test series from which you can later easily determine the optimal bath time (the same procedure is useful for coloring to achieve the desired shades).
Hydrogen is flammable and can form explosive mixtures with atmospheric oxygen. Although only very little hydrogen is produced, you should avoid any open flames near the anodizing bath and ensure proper ventilation!
5.4 Rinsing
Before coloring, the workpiece must be thoroughly rinsed under running water and then with distilled water. For parts with complex shapes, any remaining sulfuric acid should additionally be removed by soaking in a distilled water bath for several minutes.
5.5 Coloring
The rinsed workpiece is now immersed in the dye bath, heated to approximately 50 degrees Celsius, and gently swirled back and forth to accelerate the absorption of the dye. Please remember here as well: do not touch the anodized surfaces of the workpiece to avoid fingerprints – it is best to handle it only by the suspension fixture.
The concentration of the dye bath depends on the dye and the desired color saturation. Depending on the intensity of the color and the concentration of the bath, the dwell time ranges from 2 to 20 minutes. To determine the duration for a specific color saturation, the previously described test series method is again useful. This time, of course, a uniformly anodized workpiece freshly removed from the sulfuric acid bath is required. The longer the workpieces remain in the dye bath, the more intense the color. This allows for very delicate shades up to rich, deep tones.
Certain dyes can also be mixed or applied in successive baths. Due to their chemical properties, they deposit in different areas of the anodic pores, resulting in a mixed coloration.
Coloring is, of course, optional. Those who prefer the plain “aluminum look” can proceed directly to sealing. This produces a silvery-matte appearance, typical of aluminum profiles, such as those sold by the meter in hardware stores.
Up to this point, it is quite easy to abort the entire procedure if the results are unsatisfactory and start over (i.e., stripping the anodized layer with caustic soda, cleaning, anodizing, etc.).
Therefore, please:
Examine the workpiece thoroughly at this stage for surface defects!
5.6 Sealing
This is the essential process to create the hard and durable anodized surface – and it is relatively simple. The workpiece is simply held in boiling (not just warm!) water for approximately 60 minutes. This causes the pores of the surface to close, and the interconnections are transformed into their final form, which is responsible for the extreme hardness of the layer. We also recommend using distilled water and our special sealing additives, as ordinary tap water can cause limescale deposits.
6. Chemical disposal
Chemicals must not be poured into drains. Tips for safe neutralization (wear goggles and gloves!):
- Sulfuric acid – slowly add lime or slaked lime until pH 7; forms water and gypsum; proceed carefully.
- Nitric acid – slowly add lime, soda, or baking soda until pH 7; forms water and nitrates; proceed carefully.
- Caustic soda – add sulfuric or acetic acid until pH 7, or dilute heavily before pouring into drain; proceed slowly.
- Dye baths – follow instructions in technical datasheets.
Conclusion
We hope to have shown you an affordable and simple way to enhance and strengthen your workpieces. Many customer suggestions contributed to this guide. Thank you! For questions, contact us. All info (forum, FAQ, technical notes) is on our website.
And now we wish you success in anodizing and enjoyment of a professional finish!